Saturday 8 June 2013

Mixed berry & honey upside down cake

Upside down cakes have always been one of my favourites. I trace the fascination back to when I first laid eyes on the classic pineapple and glace cherry combo in my year 8 home economics class. I can't even recall the taste of that cake and I'm guessing it's because I never even tried it. I blame the glace cherries. I've never been much of fan of those sickly sweet, squeaky textured little red and green balls. It must be genetic. Every year for Christmas and Easter our Nonna makes these little round cinnamon biscuits which she decorates with a glace cherry in each centre. Everyone in our family picks off the cherry and yet she insists on continuing to use them as decoration because...wait for it..." it looks good for the visitors." I admit she does have a point. It's probably the reason why they were included in the classic pineapple upside down cake and perhaps the reason behind my love of upside down cakes. It's all about appearance. There's something magical each time you turn over the tin. It's the surprise of what lies underneath. Something shiny, glossy and simply gorgeous. And that's why I don't think I could ever get sick of upside down cakes, unless of course they are adorned with glace fruit.

This particular cake is no exception. While it bakes, it fills the house with the comforting aroma of honey.  The cake itself has a soft, moist crumb which is neither oily, nor too sweet, and the berries are a great match for the prominent honey flavour. Just the right accompaniment to a cup of tea.

Mixed berry & honey upside down cake
Adapted from a caramelised apple upside down cake featured in Food, Heart, Life, a Unilever Australia Ltd. publication.

2 tablespoons of jam (I used plum conserve)
A pinch of lemon zest
The juice of 1/2 a small lemon
1/2 cup of frozen mixed berries (I used raspberries/blueberries/blackberries)

60g (1/4cup) olive oil spread (or butter softened)
1 egg, lightly beaten
1/4 cup milk
1/4 cup honey
1 cup of self-raising flour, sifted
A pinch of salt (omit if you are using butter)
The juice of half a small lemon
The zest of one small lemon

Preheat the oven to 180 degrees Celsius. Grease the sides of a 20cm round cake tin with butter/olive oil spread and line the base with baking paper.

Spread the jam over the base of the tin. You may have to squash the jam down using the back of a spoon.
Grate the lemon and sprinkle a pinch of the zest over the jam. Reserve the remaining zest for the cake batter.
Squeeze the juice of half a small lemon over the jam.
Arrange the frozen berries over the jam/lemon mixture.

In a bowl use a whisk to mix the olive oil spread/butter, egg, milk and honey. Don't worry if the mixture appears lumpy.
Sift in 1/3 cup of the flour and add the salt, lemon zest and juice. Gently mix using a whisk to remove any lumps.
Use a spatula to fold in the remaining flour.
Using the spatula, dollop the mixture over the berries then gently smooth the mixture so that you have a flat/even layer of batter over the berries.
Bake on the middle shelf of the oven for 20-25 minutes or when a skewer inserted into the middle comes out clean. Another trick to check if the cake is done is that it should spring back to the touch.
Cool for 5 minutes on a cooling rack before turning out of the tin. This step is important as it allows the berry topping to set.


Sunday 5 May 2013

Helen's Chocolate Cake, 3 ways

Helen was my Pre-Primary teacher. I remember she had a birthday box that she would bring out when it was one of our birthdays. We were allowed to choose a gift and I remember choosing a kinder surprise, which would have to be one of my favourite chocolates, just for the surprise inside. This cake is just like that. It may look like a simple chocolate cake, no different to any other, but I assure you when you take a bite it takes chocolate to a whole other level.

There are three flavour options; plain chocolate, chocolate and espresso or chocolate, espresso and whisky. My personal favourites are the later two. The cake is deliciously moist and will keep well provided it's stored in an airtight container. The crumb is tender, though holds it's shape, which makes for beautiful slices to be served with cream (OMG- soo good). Have I also mentioned that it's a one pot wonder? It also works well as a whole cake or cute little bundts like the one we made above.


Helen's Chocolate Cake
Makes one cake or 22 mini bundts

Combine in a large pot and melt on the stove (low- medium heat), stirring regularly:

125g margarine, not butter
1 cup of water OR 1 cup of espresso coffee OR 3/4 cup espresso and 1/4 cup whisky
1 1/2 cups sugar (I used raw sugar)
1/2 teaspoon bicarbonate soda/baking soda
2 heaped tablespoons of cocoa

Then, take of the heat and allow to cool slightly before whisking in 2 eggs and 1 3/4 cup of self-raising flour.

For a cake: Bake for approximately 40 minutes at 180 degrees Celsius.
For smaller cakes such as muffins adjust the time accordingly. For bundts, baking time is approximately 10-15 minutes.


So if your feeling a little spontaneous give this cake a go- it will be sure to surprise.

We would love to hear any flavour combinations you come up with.

Thanks for letting us share your recipe Helen! :)

Enjoy x

Tuesday 26 March 2013

Tuesday 19 March 2013

Sweet Sydney Part 2

So recently we brought you part one and here's just a little more of our time in Sydney. This city has so much to offer and I will definitely have to visit again. I loved the city's natural beauty, bustling, busy streets, street performers and of course the food.
Awesome waves in Manly.
The perfectly manicured gardens of Hyde Park. Couldn't help but take a snap.


Seriously massive cruise ships in Circular Quay.
Rainbow of colour at Luna Park.

Love the Sydney monorail. Sadly though, it may soon be removed. :(


Gorgeous trees in China Town.

View from Centre Point Tower by dusk.
 
View by night.


Giant rubber duck by artist Florentijn Hofman for the 2013 Sydney Festival.

Wow :)
 
I mentioned street performers. There are many but two really stood out for me. The above photo is the entertaining and talented contortionist Bendy Em. How does she do that??! Another (not pictured) is the amazingly talented Jack Dawson. Mum bought his album after a captivating performance in Circular Quay and she has played it every weekend since (Not kidding!). Go check out his music, it's fantastic.


Sorry about the many pics. I'll post photos of foodie highlights soon.

Hope you're having a lovely week. xx


Wednesday 27 February 2013

Hot Sauce


 So a couple of weeks ago (when might I add we were in the middle of a heatwave) our Nonna decided to make sauce. Now sauce making isn't a one man (or one Nonna) job, especially in an Italian household- it's a family affair and one which our Grandparents take very seriously.

So despite it being a 40° day we gathered around in Nonna's patio to make sauce. Ever since we were little our grandparents would allocate everyone a job. The adults of course had the more 'responsible' and 'serious' tasks, while the grandkids would be allocated  random odd jobs like fetching water for parched relatives, or keeping the dogs occupied with way too many snacks. If we were lucky enough though, we would have the 'grown up' job of putting a small sprig of basil in the top of each bottle once it had been filled with sauce. We felt so responsible.

This year though the younger grandkids were at school and the all important basil garnish job was scraped. That got me thinking, was that job truly crucial, or was it just a lesson in responsibility? My younger self held hope that it was the former until Nonna informed me that the basil wasn't all that important! I was initially crushed until I realised that the small task of garnishing the sauce was important. It was a way for us to be involved and included in family traditions and for that I am grateful.

Bottles waiting to be filled.

 
Filling the bottles with sauce.
 
Tomatoes ready to be placed in the machine.

The rejected tomato skins.


So what was my job this year? I had the task of putting the bottle tops on the filled sauce bottles and fetching water for parched relatives. Not completely grown up, but getting there.


xx


Tuesday 19 February 2013

Four Berry Cheesecake


Recently, I made a glorious berry cheesecake for no reason.  Now that I come to think of it baking for no reason is the perfect reason to bake.  I had cream cheese in the fridge which I was meant to make a carrot cake with and I accidentally bought a mix of four berries when I turned away and reached into the freezers at Woolworths to avoid immediate frostbite to the face region.  I was aiming for the blueberries.

Nonetheless, often the unplanned ones are the best. Baking stuff, that is.


Four Berry Cheesecake

Crust

300 grams of digestives or Graham crackers
150g of butter, melted

Filling

375g of cream cheese
1/2 cup of icing/confectioners sugar
2 teaspoons of vanilla
1 cup of whipping or thickened cream
3 teaspoons of gelatine (dissolved in 1/4 cup of boiling water)
Zest of one lime

Topping

100g frozen berries - whichever you prefer
1/4 cup of water
Zest of one lime
2 tablespoons of lime juice


Place the biscuits you're using in the base into a food process and blitz into a fine crumb.  Mix in the melted butter, either by hand or in the food processer.  Press the mixture into the base of a springform tin.  I pressed it up the sides as well but next time I'm definitely going for the more traditional cheesecake approach and leaving it just on the base.  Refrigerate for 20 minutes to half an hour while you're preparing the filling and the berry topping!

In the large bowl of an electric mixer, beat the cream cheese, icing sugar and vanilla until it reaches a smooth consistency.  Make sure there are no lumps of cream cheese and that it's all really well incorporated.  You don't want to be enjoying a cheesecake and coming across a solidified blob of cream cheese that was sneaky and didn't want to be a part of a nice thing.

Once you've everything is perfectly combined, beat the cream into the cream cheese mixture on low speed.  

Mix in the lime zest and then add your gelatine mixture.  Pour the filling over the biscuit base.

For the topping, place all the ingredients in a saucepan and cook on medium heat until it boils.  Carefully place spoonfuls of the berry mix on top of the filling and then, using a skewer, gently swirl the berry mixture through the filling.

Cover and refrigerate until set, either for 3-4 hours or even overnight.


Finely grate some extra lime zest over the top of the cheesecake to serve! 


Monday 11 February 2013

Sweet Valentine


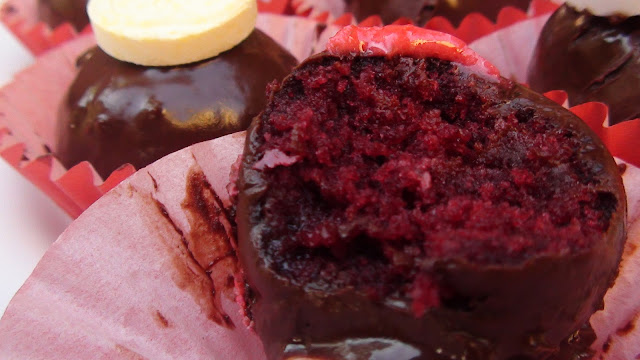
As we all know, singles' awareness day is fast approaching. Though amongst those of you with a significant other, you'll be more familiar with the day's more well-known name: Valentine's Day.  If you're looking to make a sweet little treat for your Valentine, this is perfect for you! And did we tell you it's easy? Yanno why? Because all you'll need is a box of cake mix, dark cooking chocolate (the good quality kind. No vomiting on Valentine's Day!), and a sliver of vegetable shortening and some pretty things for decoration!

Let's get started.


First, shamefully purchase a box of red velvet cake from your nearest grocery store. Try to ignore the sound of your pride dying whilst doing this.  


Red Velvet and Dark Chocolate cake balls

1 box of red velvet cake mix with frosting included
1 block of good quality dark cooking chocolate
15g of vegetable shortening (Copha)
Candies to decorate - we also made some red royal icing for cute little embellishments


Prepare the cake according to the instructions on the box. Once the cake is cooled, rest it for 10 minutes and then crumble it up using your clean hands until it is the consistency of fine breadcrumbs.  Once the crumbs have cooled entirely, prepare the frosting according to the instructions on the box and add it to the crumbs.  

Add the frosting to the crumbs and mix until well combined.  Test if the mixture is ready by rolling it into balls.  If it holds its shape, then you've achieved the right texture.  If too dry, add cream cheese or buttercream.


Take 1/2 a tablespoon of mixture and roll it into a ball.  Once all the mixture is rolled, place in the fridge for 15 minutes while you prepare the chocolate coating.

Melt the chocolate in the top of a double boiler, or in the microwave.  Once partially melted add the shortening and stir until completely melted.

Gently roll the cake balls in the chocolate, making sure the chocolate coats the entire surface of the cake ball.  Using a fork, gently scoop them out of the chocolate, allowing the excess chocolate to drip off the ball into the chocolate.  Set the coated ball down on baking paper and allow to set.

When the chocolate is half set decorate the cake balls with your favourite Valentine's candies.  This is so when it sets, the candy will be set to the cake ball.  If you let the chocolate set completely, a spot of royal icing will stick any candy firmly to the cake ball.

Place in miniature red or pink cupcake cases and enjoy!


Happy Valentine's Day!


Friday 1 February 2013

Watermelon and strawberry slushie


Today we feel like an egg left out on the pavement to cook. Broken and abandoned... Just kidding.  Temperatures here have decided to skyrocket again and so we're going to be living in 40 degree days for a bit. On the brink of heat-induced insanity, we needed to find a source of hydration and fast. Our salvation came in the form of my father knocking on the door with arms full of groceries.  Much like I mentioned in our banana and chocolate muffin recipe post, the fact that my dad can't pass up fruit on special still stands, because he walked through the door with two huge watermelons, and of course, his beloved bananas.  The conversation that occurred went a little like this:

Alexia: Hey Tash, guess what? 
Natasha: What?
Alexia: My dad just walked in the door with watermelon. He intends to eat it himself but I fully intend to sabotage his plans by turning it into a dessert of some sort.
Natasha: Bags being taste-tester.

So off we went into the kitchen to make nice things.

This, however, is why we cannot have nice things:


Cameras should come with a warning: "Objects viewed through camera are closer than they appear," to stop things like this happening.  Or maybe Alexia should just be more coordinated.  Neither of these things seem likely to happen in the near future.

Regardless of fails, this slushie is so easy, you are only three or four ingredients away from a refreshing and cooling healthy slushie thing.


Watermelon and strawberry slushie:

To every 2 parts of watermelon you use, add 1 part of strawberries and add one and half cups of ice. Whizz it all up in a blender and serve.  If you want to, you can add a sprig of fresh mint for an even fresher summer hit. Serve and enjoy!


Sunday 27 January 2013

Sweet Sydney Part 1


The start of  2013 has seen us travel to Sydney for a little break! As Sydney basically stomps all over Perth in terms of cupcakeries, I had to try these cute little things when I accidentally stumbled upon the cute little shop while I was self-medicating with retail therapy along Sydney's shopping strip on George Street.


The weather was pretty bad, as you can tell from the photo, so I didn't spend any time standing in the downpour outside trying to take a photo of their window cupcake display, but you'll have to trust me when I say that it was everything a cupcake display should be: cute, colourful and gorgeous! You're spoiled for choice, to say the least. 


After having a breakdown facing the fact that no, I couldn't, in fact, have all the cupcakes in the shop because they would be impossible to bring back home on the plane (literally, that was the only thing stopping me from rolling around on the floor of my hotel on a pile of cupcakes - plane impracticalities), I chose four flavours which I thought would make me weep with joy.  Clockwise from the top left I bought a chocolate, vanilla strawberry, the classic red velvet, and a chocolate chilli cupcake - all up I spent something like 16 dollars (Australian) on the four cupcakes.


We were eager to tuck into these cupcakes as we'd seen the bakery's website and once spent hours wishing that we had something similar in Perth.  


First up, the red velvet cupcake. I loved the icing swirl on top and the little red heart was adorable! Though I kinda wished they had crumbled some of the cake on top of the white icing. I love that about red velvet cakes, having the bright red velvet cake crumbs set off against the white icing is just stunning to me. The red velvet was really yummy, made better by the great crumb of the cupcake and the icing was to die for - smooth and full of flavour.


Unfortunately my love for the rest of the cupcakes wasn't as strong.  I found the vanilla cake of the vanilla strawberry cupcake lacking in flavour and too dense.  The centre of the cupcake had a little spot of strawberry jam which really added to the strawberry hit of the cake, which I really liked. The frosting was the saving grace of this cupcake, smooth and delicious with a pretty sprinkling of pink sugar on top.


The chocolate cupcake looked absolutely decadent with its rich chocolate frosting and mud-cake like texture.  I adored the swirl of frosting and its chocolate shavings, and they tasted incredible. The cake though was less impressive, lacking in flavour and a kick of salt, there wasn't enough of a chocolatey hit.  Whilst eating it I was just waiting for this massive bash of chocolate but it never came which made me sad. You were left wishing for more. The frosting can't speak for the cake, they both have to be strong on their own and I thought it wasn't the case.  That being said, I do think people who like their desserts not too rich would enjoy this.


The chocolate and chilli cupcake was much the same story with the lack of chocolatey hit in the chocolate cake, but the frosting was really yummy again.  Taking a bite out of the cupcake you're left wondering where the chilli comes in until you swallow and your mouth starts to burn.  The tingle of heat from the chilli made me smile, I really loved it! The chocolate chilli combination has always been a favourite of mine.


And it wasn't a trip to the eastern states without a Krispy Kreme doughnut hit, of course! I wish these could be a part of everyday life in Western Australia like they are over there but alas...


My brothers chose the strawberry glazed, two original glazed and a chocolate glazed doughnut, which all were freaking delicious. No doughnut can ever compare.

The strawberry glazed one was devoured instantly upon opening this box.
Stay tuned for more Sydney sweetness!